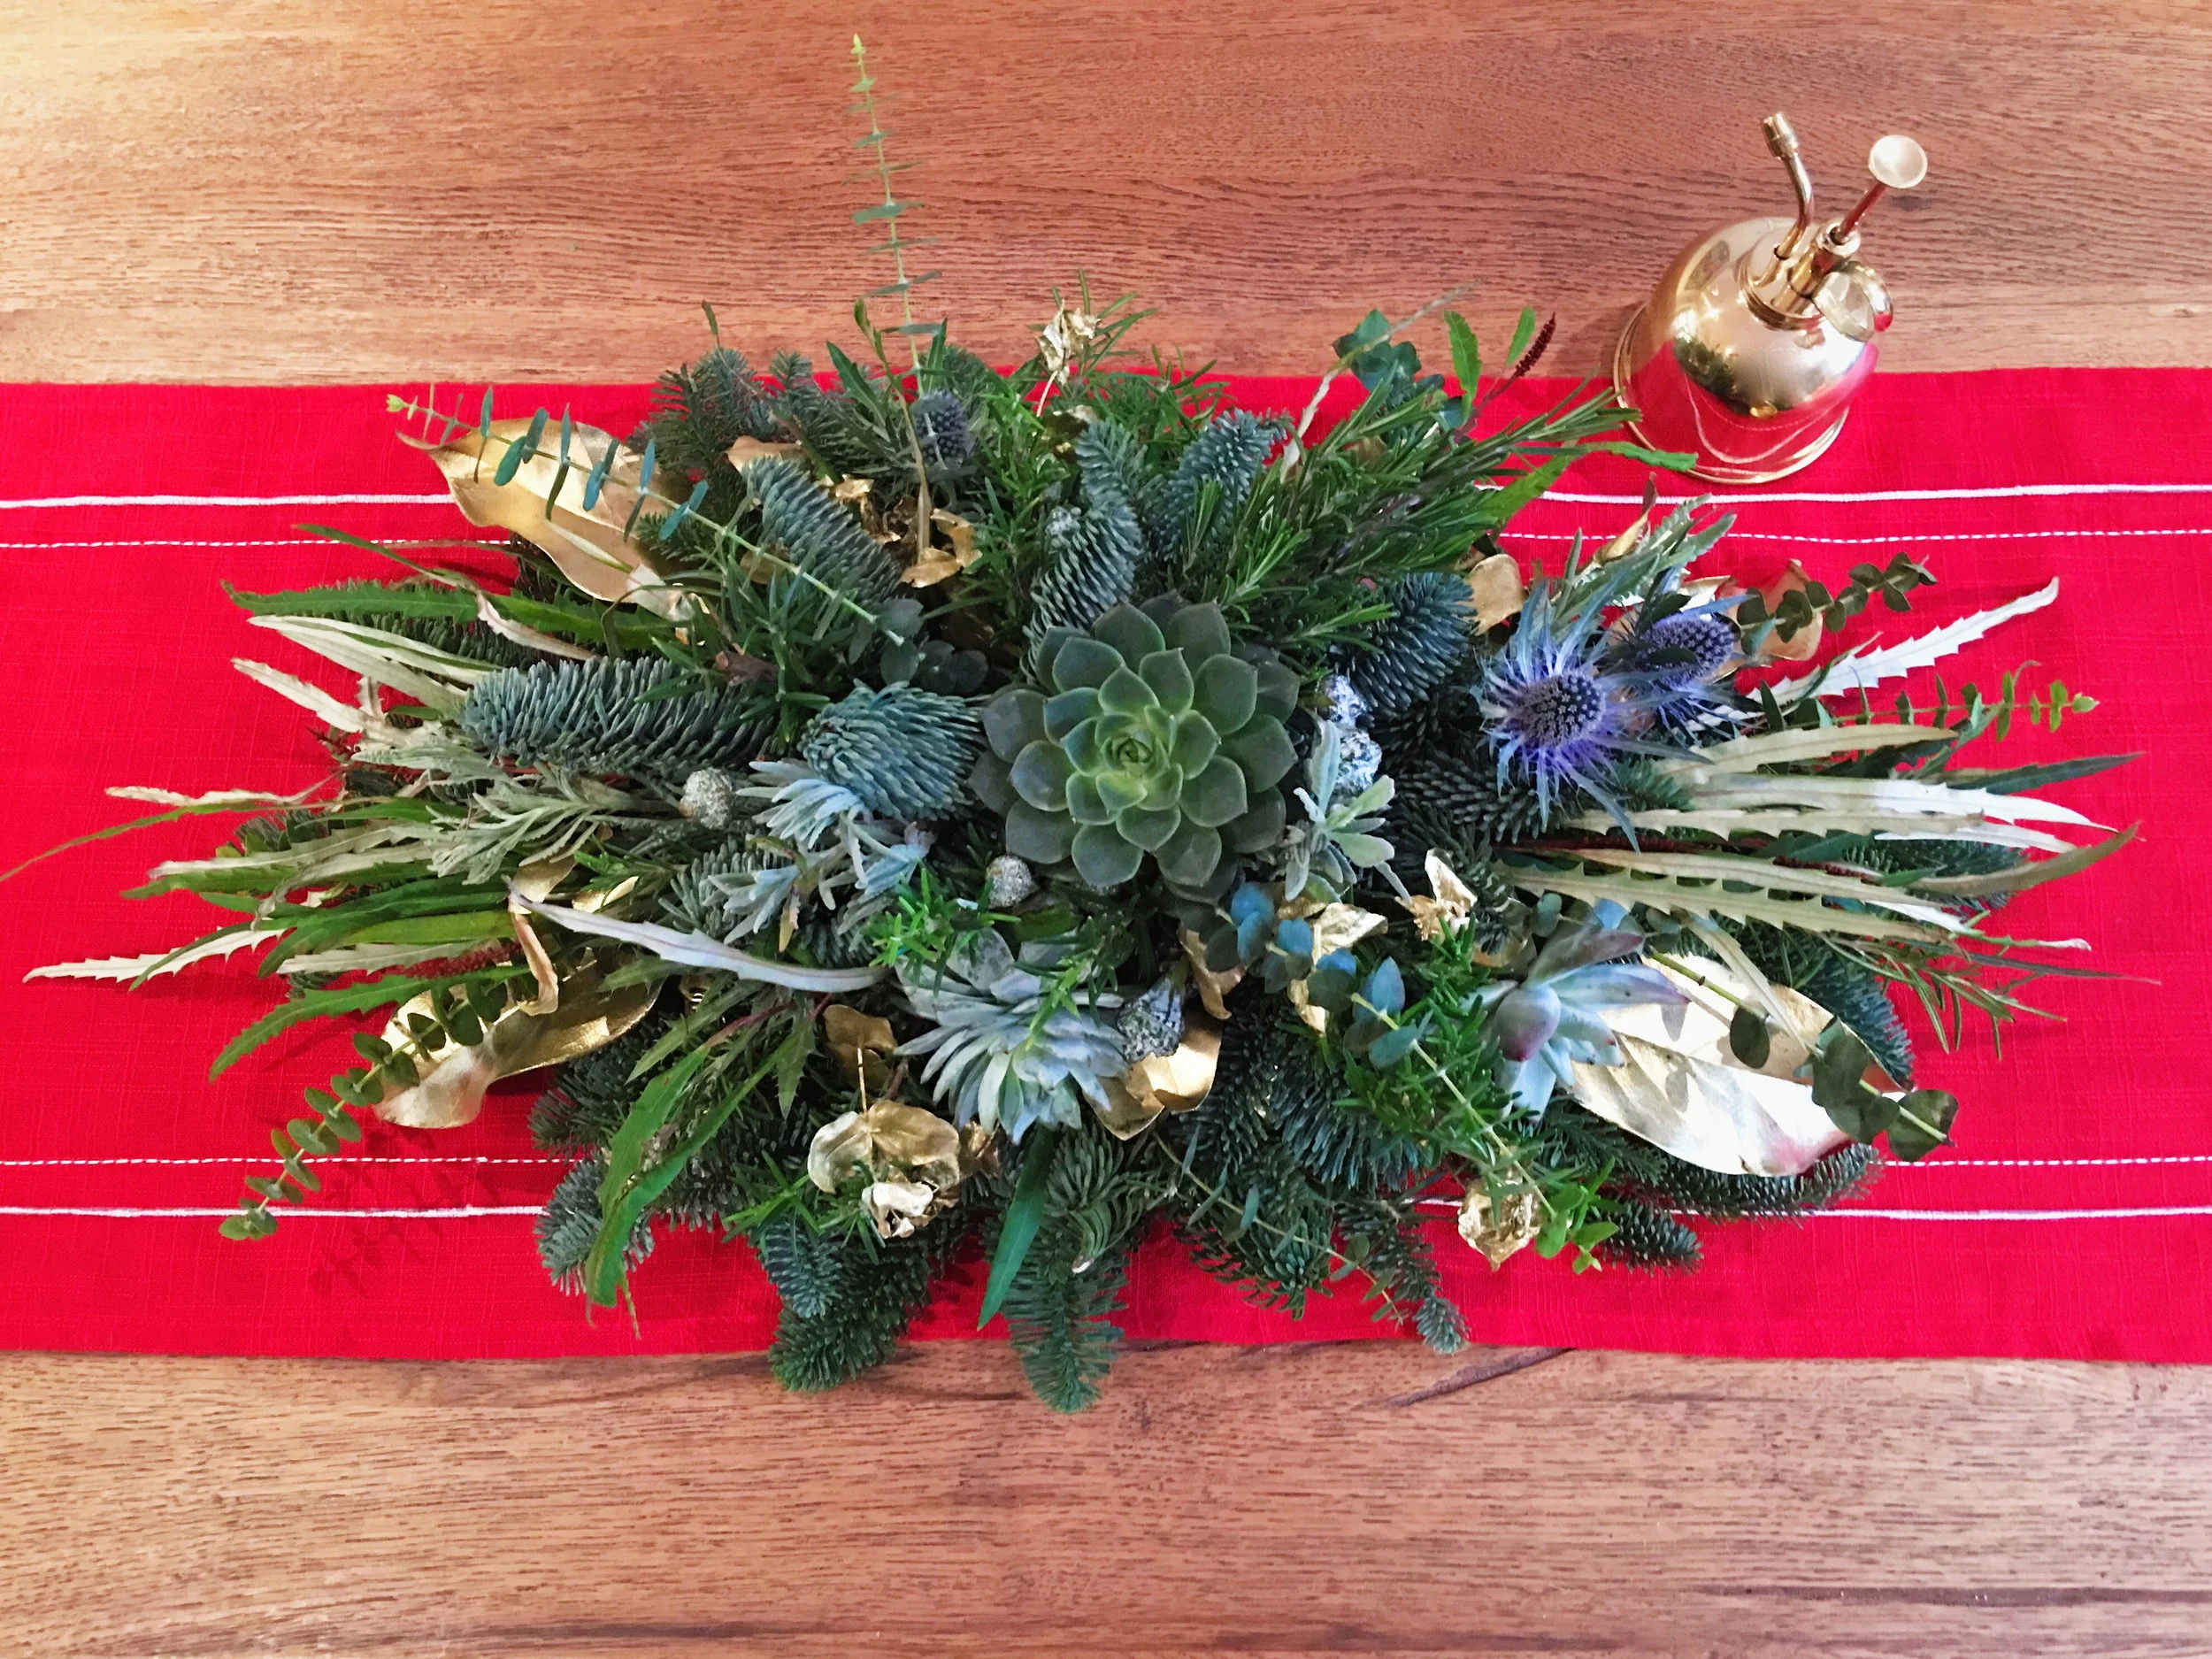
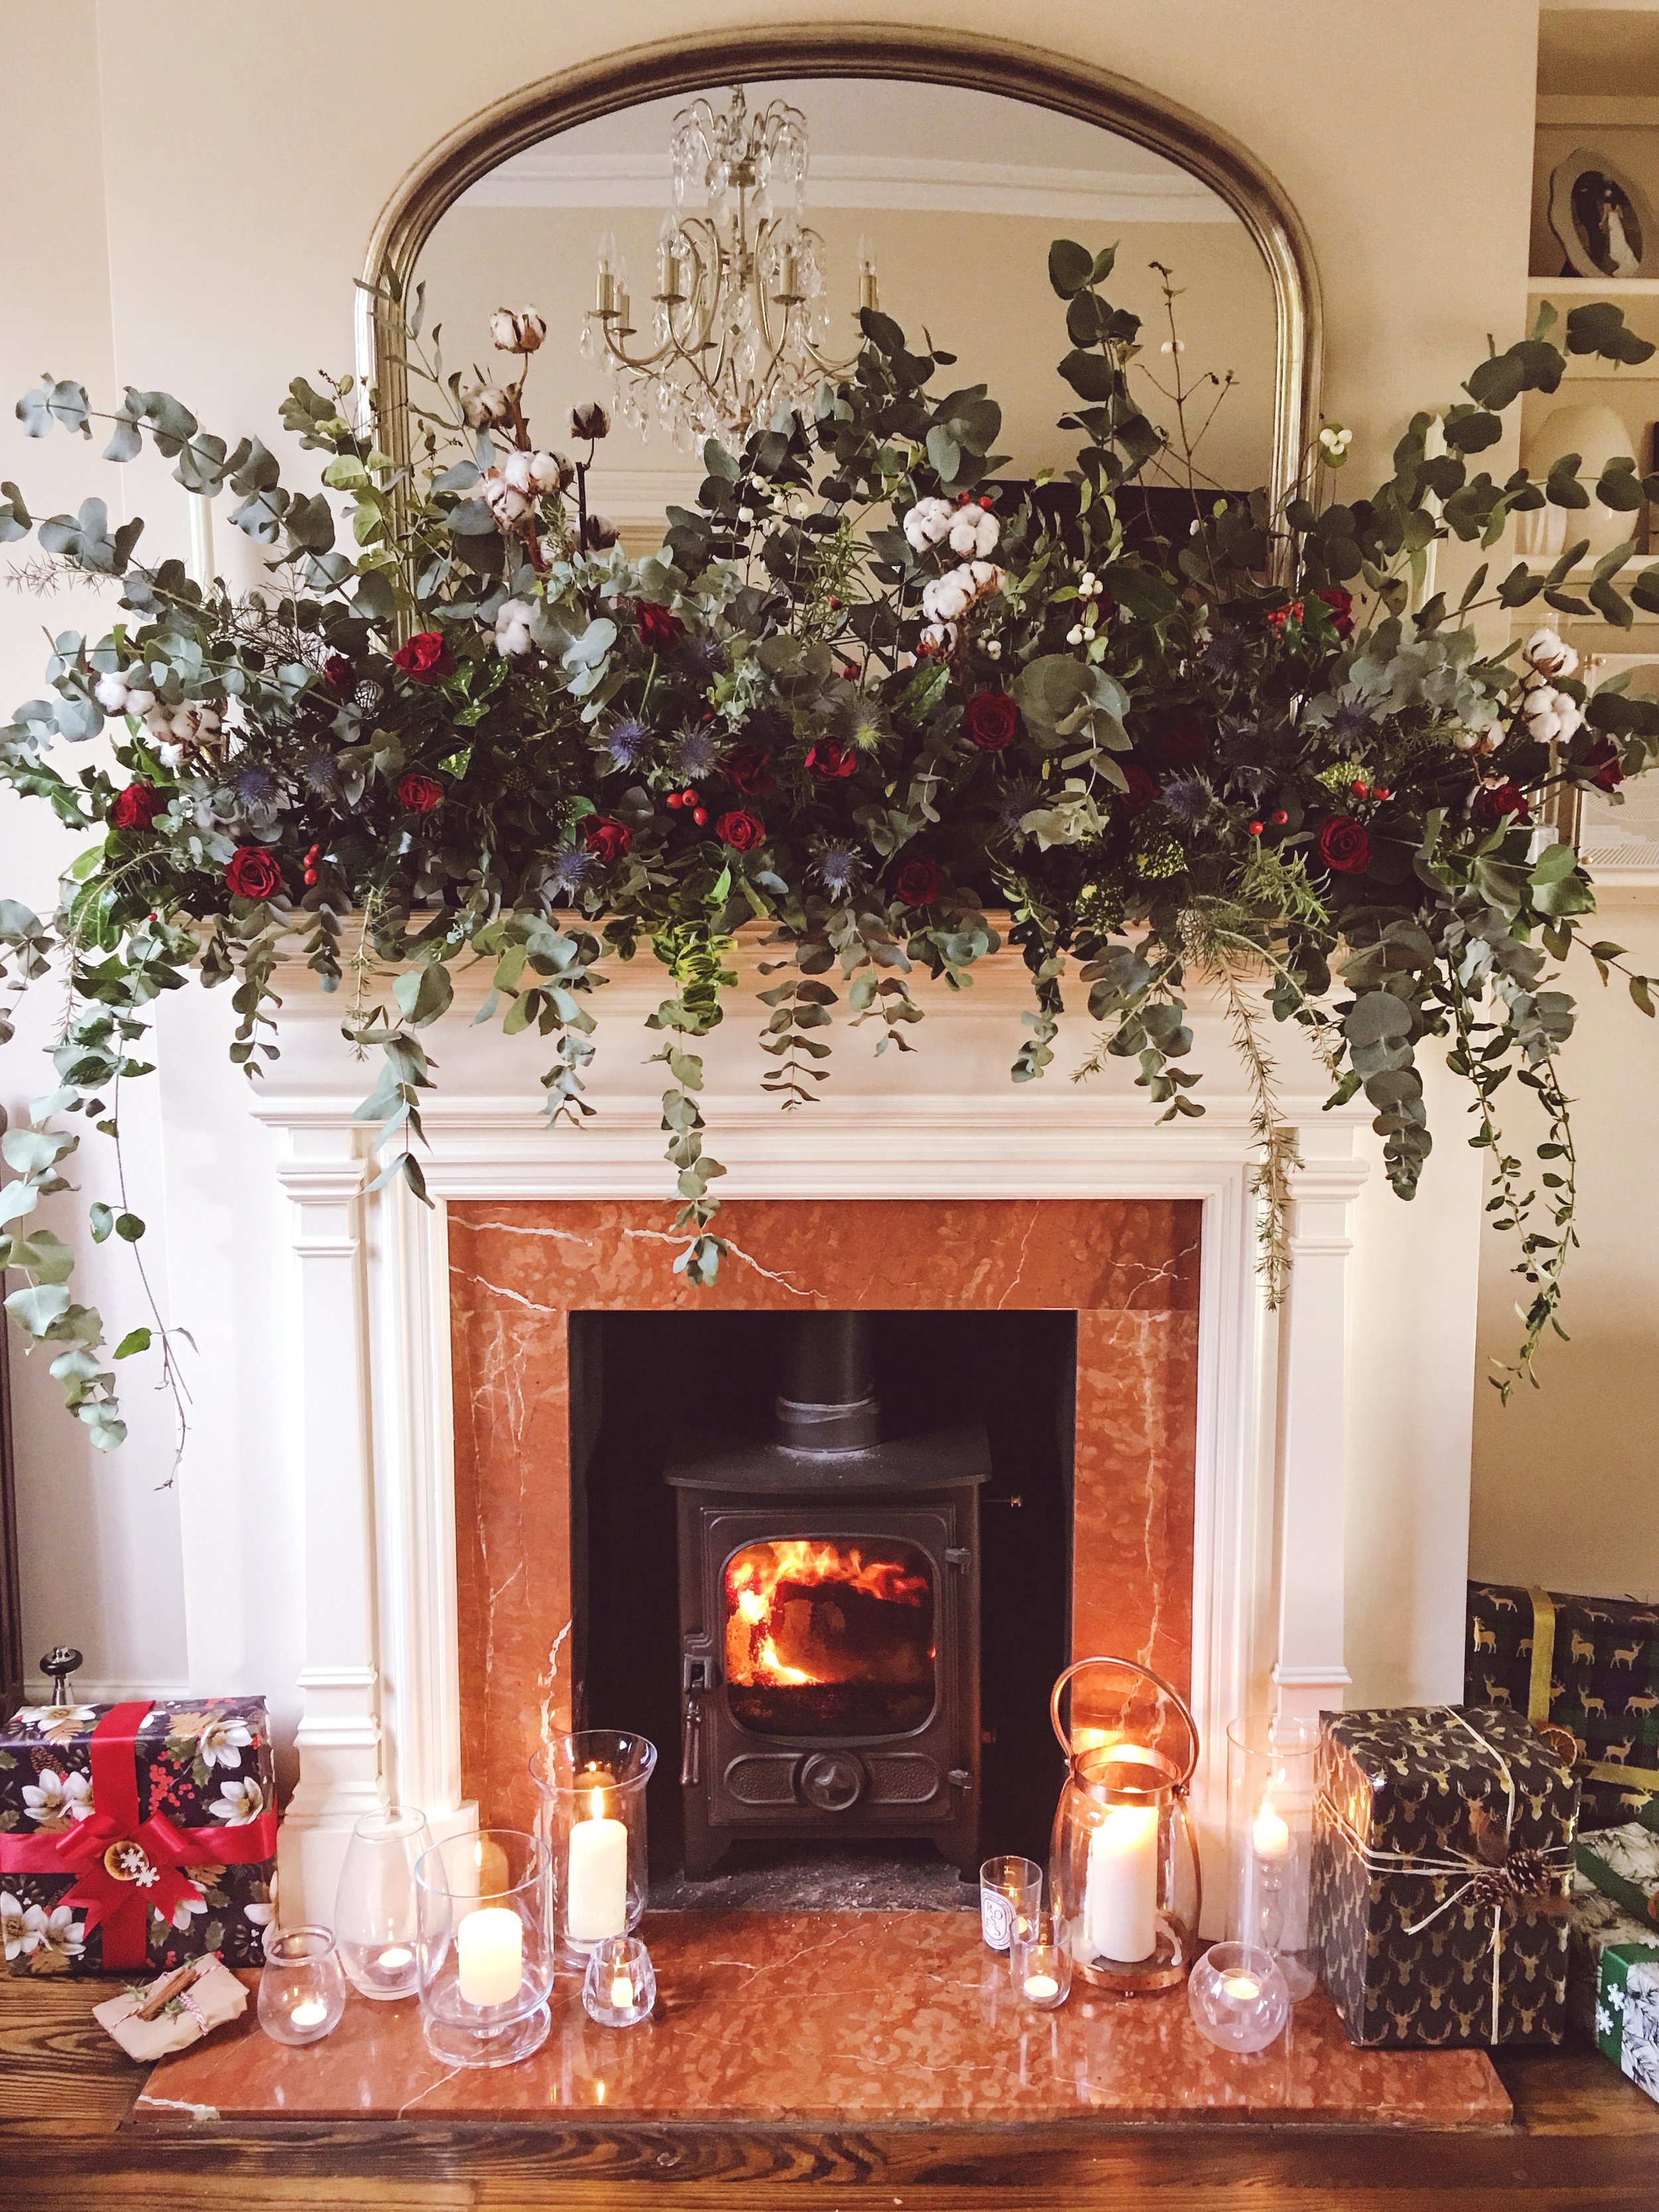
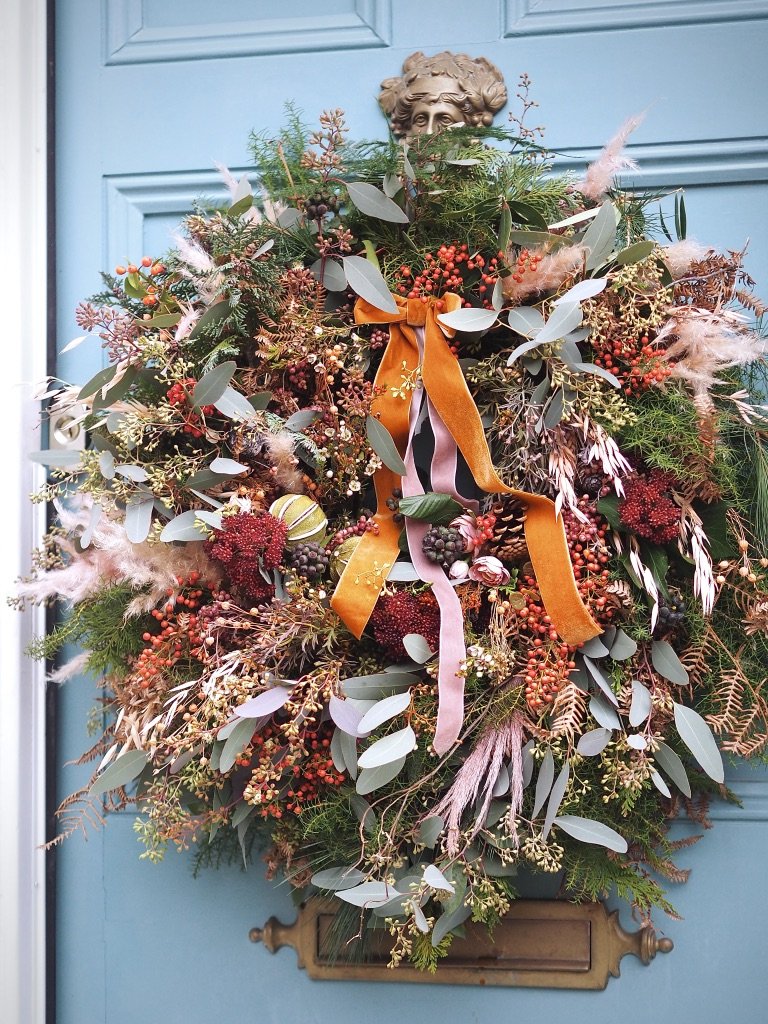
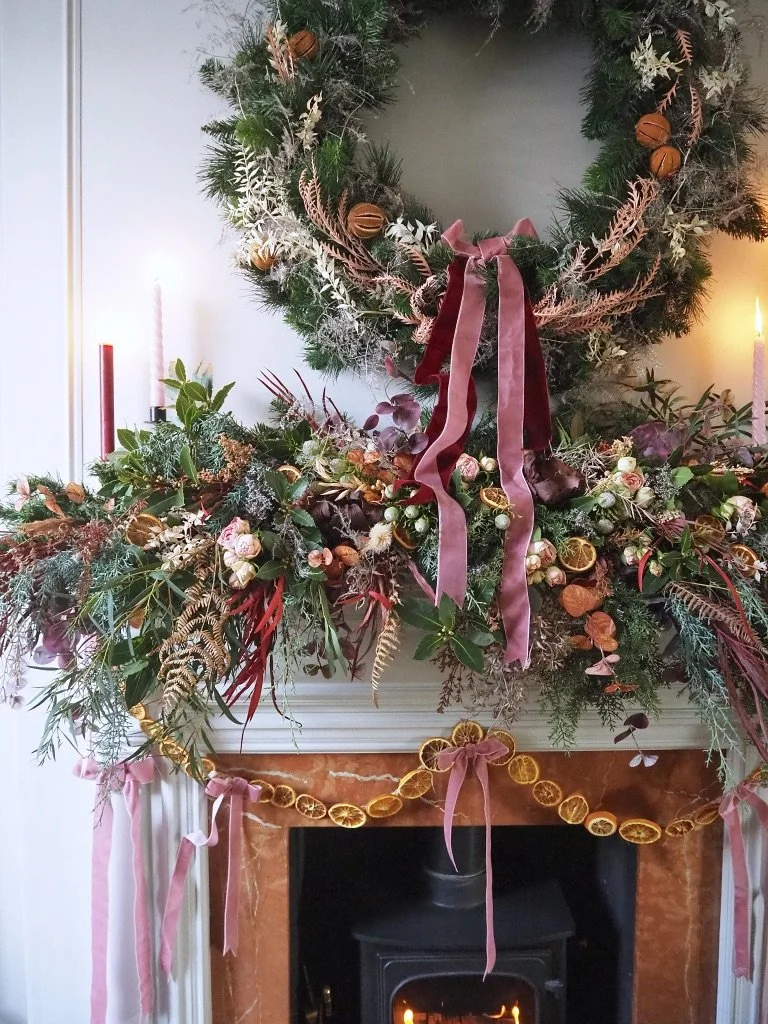
7 Simple Christmas Styling Ideas For Festive Instagram Pictures

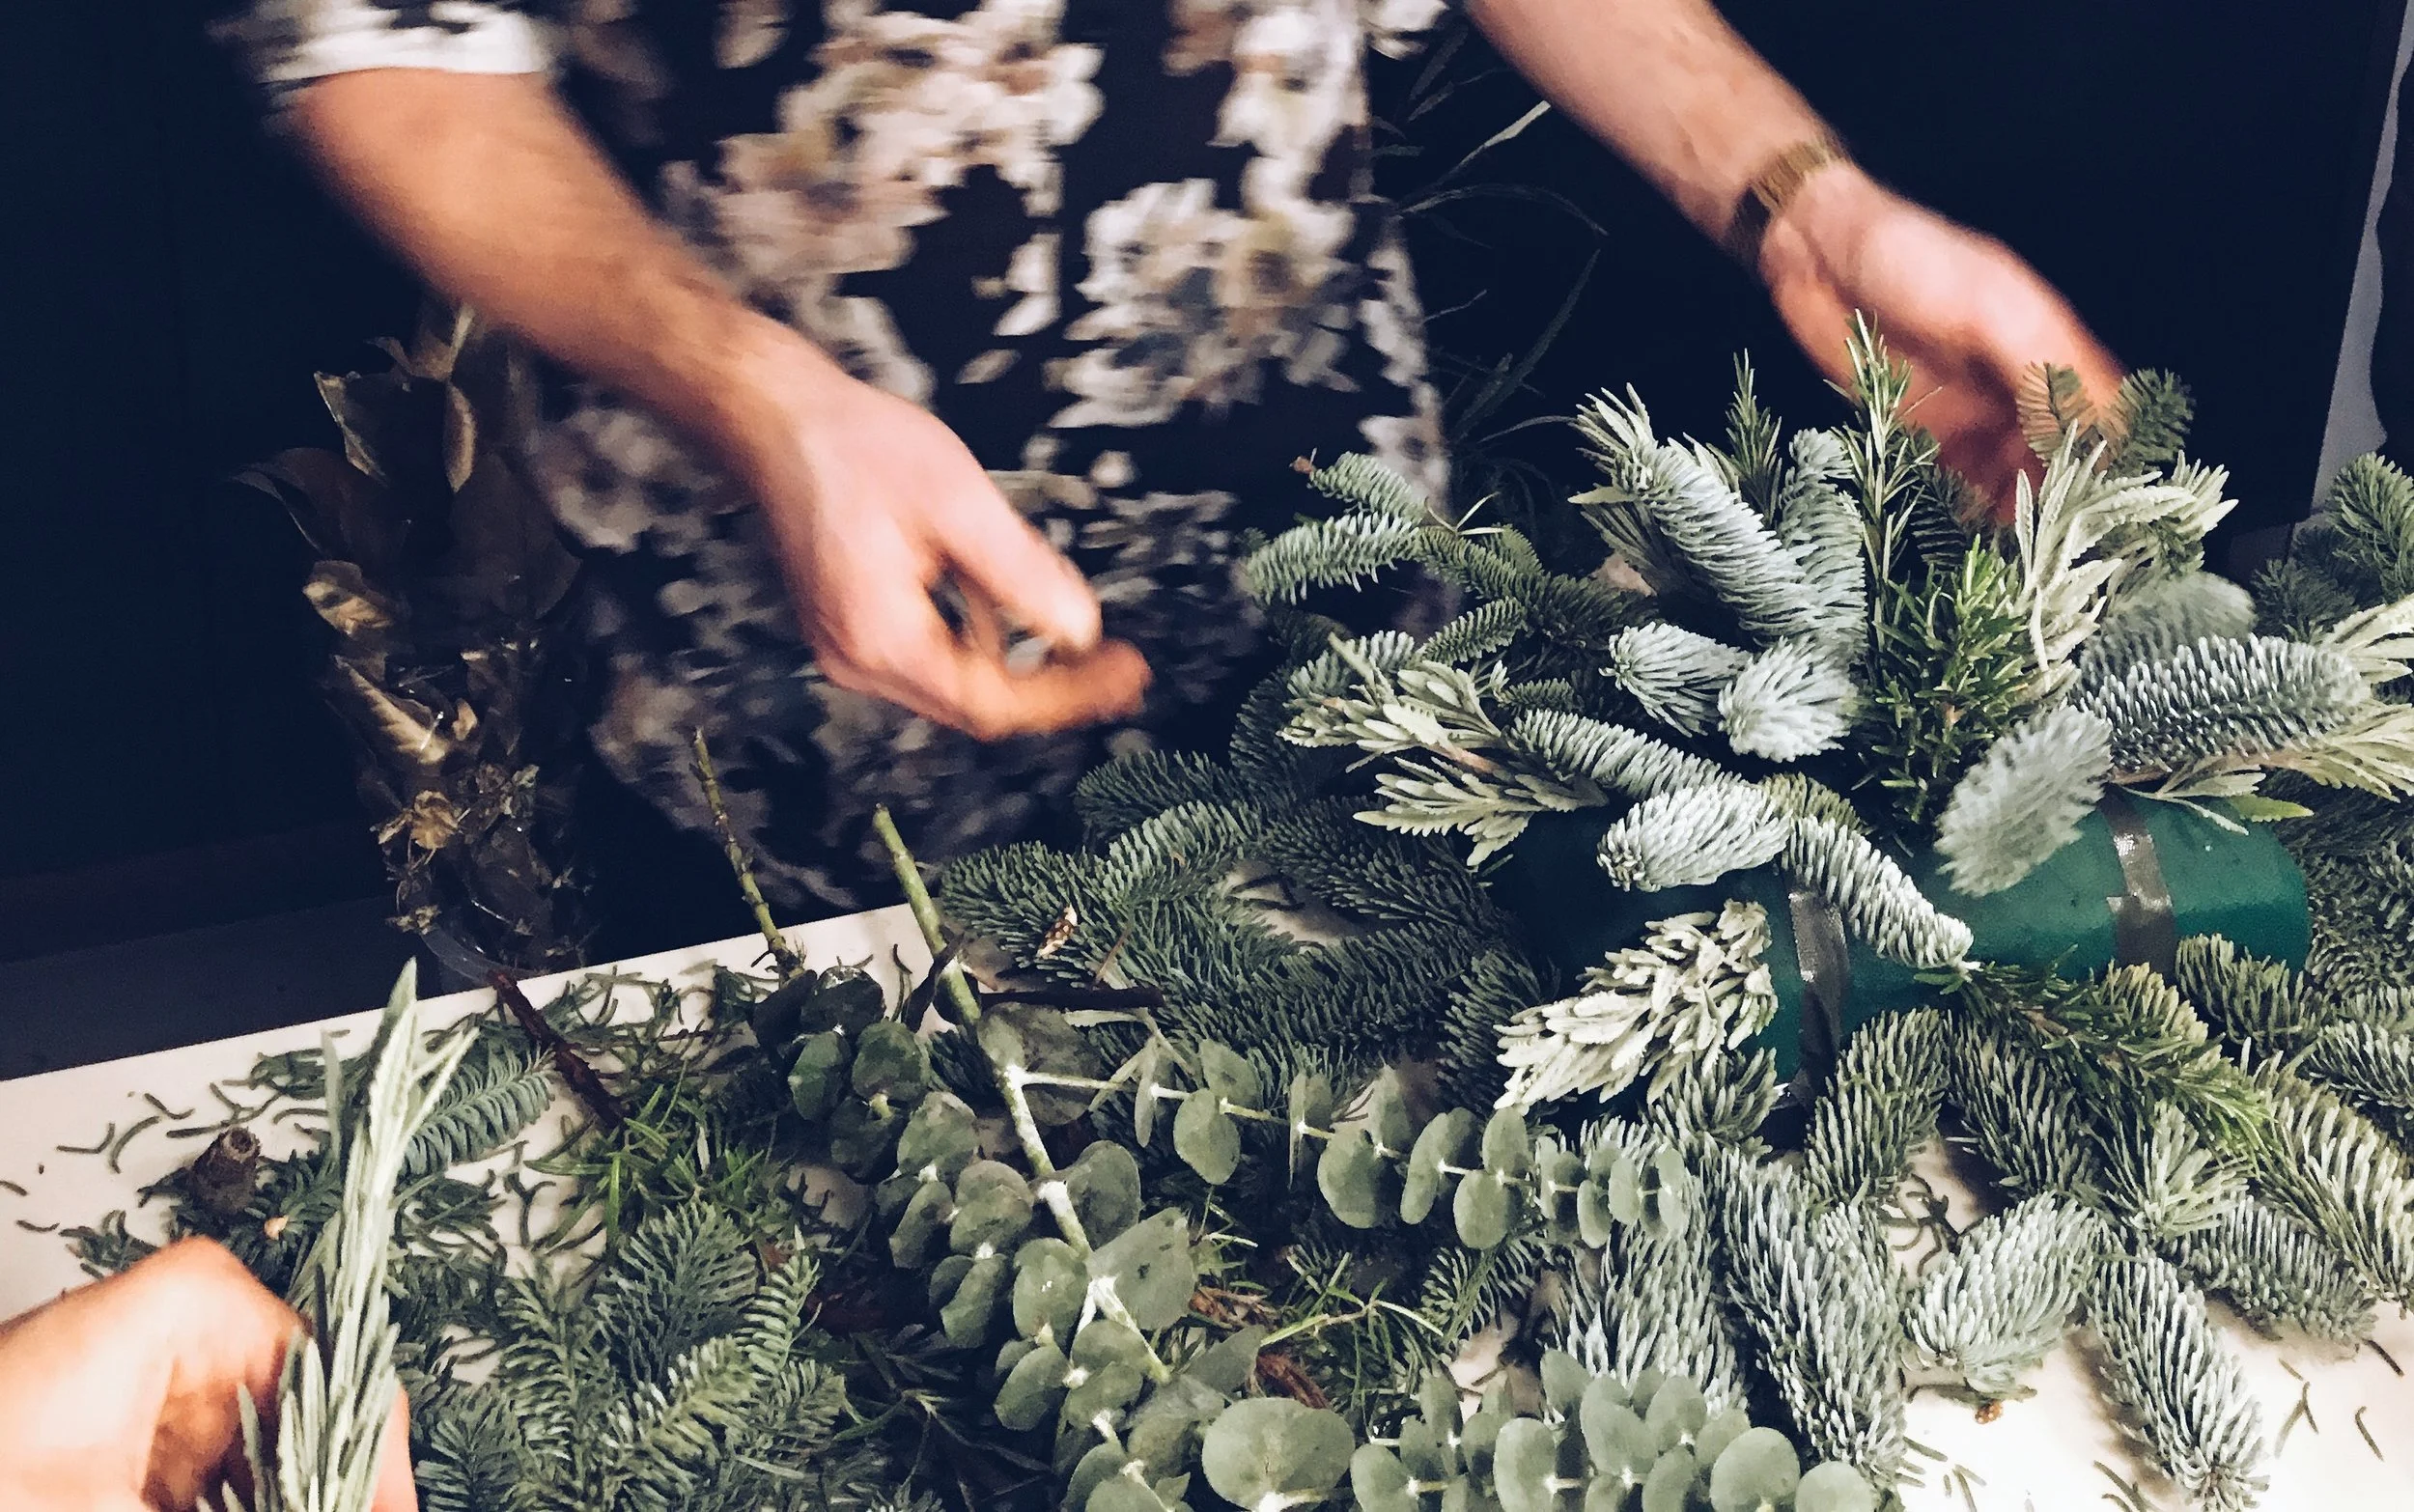
‘Tis the season for…..doin’ it for the ‘gram! Chances are if you read my blog you are either one of two things (or both): an interior fanatic who loves changing things up at home and / or addicted to interiors on Instagram. There is nothing like a bit of festive inspo on Instagram when it comes to this time of year (although the vast amount of ‘Christmas In November’ on Insta this year has rightly had a few people shudder in horror.) This Christmas I was lucky enough to collaborate with House Of Fraser, styling a few of their Christmas collections in my home

Read More

DIY Advent Calendar Indoor Wreath

I was recently commissioned by the chocolate company Green & Black’s to create some Instagram Christmas content with their Miniature Bar Collections. I decided to create an indoor wreath which also doubled up as a DIY advent calendar, as this way I was creating something decorative for the home as well as it having a function! This is the end result below, which I was quite happy with as it looked quite pretty and filled the house with the smell of eucalyptus.

Read More

How To DIY A Xmas Wreath Like A Pro

I always make a Xmas wreath every year for my front door, but I'm totally self-taught. I just go with an idea in my head and run with it, which is great, but sometimes it is nice to get an insight into just how the professionals do it. When a really great florist makes a wreath, there is often something unexpected in the mix, and you know it will last right through over Xmas without wilting or drying out!

Read More

Trees & Baubles: My Home At Xmas

Well hello and welcome to this years 'My Home At Xmas!' I can't quite believe it but this year is actually the first Christmas since my living room has been painted blue. The Xmas scheme for 2017 therefore had to match the new walls, so I am delighted to have partnered up with Balsam Hill this year as part of their 'Trees & Baubles' blog hop.

Read More

Create A Pretty Easter Display With Painted Branches & Hanging John Lewis Decorations

The Easter Bank Holiday falls three weeks later than last year for 2017, so its after the school holidays. For those of you with children to entertain, or for those of you with dogs to walk, I thought I'd share with you my 'Easy Easter Tree'. This tree costs virtually nothing to make, but provides a beautiful focal point in your home over the Easter break. All you need is a bit of branch collecting and some left over white paint!

Read More

DIY Pastel Easter Door Wreath Made From Cheap Plastic Eggs

For my Easter door wreath this year, I wanted to make something really full-on and dramatic.  I feel like i've achieved that with this egg-tastic door wreath! This wreath was really cheap to make, but it wasn't the quickest thing to knock up. If like me you are dedicated to the cause of having the best Easter wreath in town for a few quid, then read on my like-minded friends...

Read More

Have A Grown Up Valentine's Day With Tea & Handcrafted Biscuits

In the 10+ years that my husband and I have been together, we have never celebrated Valentines Day. Yep, that's right. No soppy cards to each other, no red roses, no date night on Valentines Day. Shortly after we became an item, my husband declared how he detested Valentines with the words "I don't need card companies to dictate to me when and how I should express my feelings." To be honest, I agreed with him. Valentines Day, with it's tacky heart-clutching teddy bears, overpriced flowers and the over-booked, set-menu restaurant dates just had no appeal.

Read More

Create A New Year's Eve Table Setting With Christmas Leftovers!

Everyone overbuys at Christmas. "It's best to have too much than not enough" being echoed far and wide in supermarkets across the land, days leading up to the 25th. Yet I feel guilty as Christmas also turns into the season of waste as uneaten fruit and veg goes off, decorations get discarded and stuff with still a bit of life in it gets binned as it no longer serves a purpose. That's why my blog post to you today lovely readers is all about how to create a glam New Years Eve party table setting with all your left over Christmas bits and bobs!

Read More

How To Make This Succulent Christmas Table Centrepiece


This brass mist sprayer is by Haws

This brass mist sprayer is by Haws

I was recently asked by the lovely ladies at MK Design and Occipinti if I wanted to attend their Christmas Table Setting Workshop held at the Republic of Fritz Hansen. The answer was of course a resounding 'hell yes!' The chance to get all Christmassy and crafty, drinking mulled wine and creating a floral table centrepiece with boutique florists Agent F was something that sounded VERY appealing (booze and floral displays - two of my favourite things!)

I ended up making and bringing home this festive spruce, succulent and gold leaf centrepiece; and I'm going to reveal how it can be made so you too can create a boutique floral table display in your home this Christmas.

First up, you need one block of oasis and an oasis tray (of which you can buy both in craft stores for less than a couple of pounds). Here Agent F have also used some floral tape to secure the oasis in the tray. You need to soak your oasis in water before you start making your display. Tom from Agent F gave me his top tip of filling a sink with water, then just leaving the oasis on the surface of the water until it sinks. Once it's submerged, then it's ready to be used. If you dunk the oasis you get water bubbles inside the oasis and it never fully absorbs all the water. I never actually knew that and always dunked my oasis, so thanks Tom!

Chop your spruce into small, three shoot pieces.

Chop your spruce into small, three shoot pieces.

You then need some spruce. You can buy bags of this at flower markets, garden centres, or you can forage it if you know where some grows wild locally.

Use secateurs or sharp scissors to cut the stalk at a diagonal angle - this will make the spruce easier to insert into the oasis, as well as making sure the stalk is more exposed to absorb water. Strip the bottom of each stalk of needles so you just have bare twig to push into the oasis.

Tom from florists Agent F showing us how to get started.

Tom from florists Agent F showing us how to get started.

You then need to insert your spruce around the base of the oasis block. You want to hide the oasis tray, while also creating a layer to build your floral display on. Make sure the two ends of the oasis block have quite long bits of spruce, then the side shoots should be shorter. The aim is to create a rectangular shape at this point.

This point was key - use your spruce around the base to cover the tray, and then add just a few sprigs in the centre at the top of the oasis.

This point was key - use your spruce around the base to cover the tray, and then add just a few sprigs in the centre at the top of the oasis.

Once your base was covered, add a couple of pieces of spruce in the top-centre of the oasis block.

I find any Christmas craft is more enjoyable with multiple glasses of mulled wine!

I find any Christmas craft is more enjoyable with multiple glasses of mulled wine!

Starting at the top where your couple of spruces exist, add in cut pieces of herbs and foliage like rosemary, lavender and eucalyptus until about 70% of the oasis is covered.

This is my centrepiece being built. I tried to keep length at either end, and not create too much height on top.

This is my centrepiece being built. I tried to keep length at either end, and not create too much height on top.

The next part was adding in some glamorous gold to break up the green, by adding in dipped-dyed magnolia leaves and eucalyptus to our displays. Tom told us you can buy this metallic foliage from florists and flower markets, but I couldn't see any reason to why you couldn't just spray-paint some foliage yourself at home.

These are magnolia leaves dip-dyed in gold paint.

These are magnolia leaves dip-dyed in gold paint.

For me, the key to adding the gold was only using it sparingly (too much and your display will look a bit tacky and fake). Use only a few, well spaced out pieces and it instead gives it a festive, glam touch.

Add metallic foliage sparingly.

Add metallic foliage sparingly.

The next part for me was the most interesting, as I would never have thought to add in succulents to a Xmas display, but it worked so well. Using floral wire (again, this costs less than a pound for a pack at craft stores), thread your wire through the base of a succulent head (you may want to trim the wire diagonally to make it more sharp), bend the wire over, then this will create a 'floral bobby pin' for you to attach your succulent into your oasis.

Use florist wire threaded through the base of a succulent head to keep it attached in the oasis.

Use florist wire threaded through the base of a succulent head to keep it attached in the oasis.

Then it was time for the finishing touches! Any gaps were filled with beautiful thistles and eucalyptus pods.

For ideas on festive plants and foliage to use in your display, check out this great blog post by Rona Wheeldon.

I'd like to thank MK Design for inviting me to their fantastic workshop. You can find out about any future interior workshops they are holding here.

How To Make An Indoor Honeycomb Pom Pom Wreath

It was an absolute honour to recently be asked to write a guest post for the lovely ladies at Mia Fleur. If you have not heard of Mia Fleur, they are an incredible family run business who sell the most beautiful and interesting homeware products! Chances are if you've seen something totally original and quirky for the home, it's come from Mia Fleur.

Read More

My Home At Christmas (+ How To Make This Fireplace Garland)


I've gone all out this year with a real flower fire surround garland!

I've gone all out this year with a real flower fire surround garland!

Welcome to my house at Christmas! If you are joining me as part of the UK Blog Hop from We Love Home, an extra thank you for joining me here! I'm so chuffed to be part of the first ever UK Home Blog Hop, courtesy of the lovely Kimberly of the ultra-fabulous Swoonworthy. In my Hop, you'll find some crafty Christmas DIYs and tips on having a handmade Xmas. So come on in, help yourself to a mince pie and let me show you around.....

Even though I'm a fan of more contemporary decor the rest of the year, at Xmas I prefer a traditional look (reds, golds, greens, fir cones and berries). However, I like to go BIG! BIG tree, BIG flower displays, LOADS of table decor.

Earlier this year at a Red magazine event I attended, florists had decorated the mantels over fireplaces in the room with these huge pink summer flower garland displays. It was really effective, so there and then I decided I was going to do a festive version in my home this year for Xmas. A few oasis blocks and a few bunches of flowers later, here it is in my living room. It's perfect as a striking decoration if you are throwing a party over the festive season - and at a total of £32 to make (£24 on flowers, £8 on oasis) it looks a lot more expensive than it is! To learn how to make this garland yourself, scroll down to the guide at the bottom of this post...

IMG_3039.JPG

Putting together the table decor is one of my favourite parts of Christmas. I make flower arrangements a couple of days before (usually with foliage I've cut locally, like holly and rosemary), then go to town with candles and red and gold table wear. A few years ago I made these gold leaf pear place name holders after seeing the idea on a Kirstie Allsopp Christmas craft program. They went down pretty well at a dinner party that year, so this year I've made them again:

This fruit bowl is the LOTTA glass and ash base bowl from LSA International.

This fruit bowl is the LOTTA glass and ash base bowl from LSA International.

For tree decorations, I'm all about glass and birds! I bloody love a faux-bird on my Xmas tree. Joining the pheasants, robins and peacocks this year will be a 2016 interiors classic - a flamingo! (A purchase I made in October when I stumbled across him in John Lewis.)

I brought this peacock decoration in Liberty. I pimped him up for the top of the tree by sticking on real peacock feathers from Hobbycraft on the back.

I brought this peacock decoration in Liberty. I pimped him up for the top of the tree by sticking on real peacock feathers from Hobbycraft on the back.

I also love real glass decorations which I make by filling with feathers, pom poms and glitter. You can find out how to make these yourself here.

These glass and feather tree decorations are easy and cheap to make.

These glass and feather tree decorations are easy and cheap to make.

IMG_3261.JPG
I always make my door wreath for Xmas. Learn how to make this wreath here.

I always make my door wreath for Xmas. Learn how to make this wreath here.

Once boxing day has passed and we move towards New Years Eve, I move away from traditional Xmas decorations to something more fun and colourful. Having a child and getting old means I hardly go out NYE anymore (no-one wants to babysit NYE, and I now baulk at the extra charges for a drink/cab), so NYE is usually spent at home with friends. I'll therefore change up my decor to something like this fun pom pom indoor wreath!

These super pretty bird and butterfly decorations are from Pom Pom & Twiddle

These super pretty bird and butterfly decorations are from Pom Pom & Twiddle

I handmade this Pom Pom garland for a guest post on the Mia Fleur blog which is coming soon!

For my top present wrapping tips click here.

For my top present wrapping tips click here.

HOW TO MAKE THE REAL FLOWER FIREPLACE GARLAND

You will need:

  • Oasis blocks and an accompanying tray. I measured the length of my fire surround and discovered that I would need 5 blocks of oasis to make a garland the required length. You can buy oasis blocks in craft stores for around £3 for a pack of four. Alternatively, a local florist will sell you single oasis blocks. You will also need an oasis tray to keep topping up your oasis with water if you are going to have your garland up for a good while. These trays cost 80p each from my local craft store.

  • A selection of flowers and foliage to make up your garland. For my garland, I brought two large bunches of eucalyptus, 20 red roses, 4 stems of cotton flower and one large bunch of thistle. I brought my flowers from Columbia Road Flower Market and it cost me a total of £24 for everything! Flower markets are great for getting a large choice of cut flowers. Go later on in the day and you'll also get yourself a bargain as they slash prices to clear stock.

  • Some garden secateurs, a plastic bag and some protective gloves to go foraging with! To bulk up the display, cut greenery from hedgerows and evergreen plants. There are loads of holly berries around this year as well as snow berries. Take a few cuttings where you can!

Start by filling a bucket/the sink/bath with water and submerging your oasis blocks in it for about 15-20 minutes so they suck up loads of water. Remove them into the oasis trays and put them in a line across your fire surround. 

Start with your eucalyptus/chosen foliage and stick it in the oasis blocks, concentrating on creating height. Stick your tall eucalyptus sticks towards the back of the oasis blocks, saving the front for your floral display.

Place some shorter, single eucalyptus sprigs at the bottom of the front of the blocks so it creates a trailing effect over your fireplace.

Start to add in your other flowers at the front, larger flowers first, leaving smaller flowers like roses and berries until last. Position them evenly across the garland.

Once your brought flowers are all used up, use your foraged greenery to fill in any gaps. The aim is to not see the oasis blocks or have any gaping holes in the garland.

My garland took about 30 minutes to put together and was easier than I had anticipated. My top tip is just to shove it all in! If it looks bad in places move some stuff about, cut away anything that looks too long, have fun with it!

So that's all from me, and Bowser my King Charles Cavalier (doesn't he look so happy being made to wear a doggie Santa hat for this post??) Thank you for taking the time to look round my home at Christmas - we've loved having you!

You can find all my Xmas DIYs here if you want to get crafty at Christmas this year. Otherwise, hop on over to Fresh Design Blog tomorrow from 11 am to continue the Hop! A full list of other bloggers’ houses from the week can be found below - just click on the links! There have been some great posts this week full of crimbo inspiration, so enjoy! And Merry Christmas!

DIY Gold-Leaf Pear Place Name Holders For Xmas & New Year Dinner Parties!

Gold leaf pears are not a Xmas craft that I can take credit for. In fact, I first learnt this simple Xmas DIY about 10 years ago on 'Kirstie's Handmade Xmas' TV show (you know the one where Kirstie Allsopp tries her hand at traditional Xmas crafts each year on Channel 4. I bloody love it!) I first did gold-leaf place name pears for a Xmas dinner party I was hosting back then, when the show was first aired. They were a huge success, so I thought I'd revisit them for 2016 and document them on the blog.

Read More

Make These Simple Glass And Cork Bottle Tree Decorations!

I'm working with Swiftcover again this week as part of their #swifthomehacks campaign, to show you a cheap and super easy DIY to make your own Xmas baubles! Last Christmas I noticed that there was a real trend in the more upmarket department stores for tree decorations that were miniature glass bottles featuring glamorous feathers inside. The stores were selling these decorations for about £4 - £7 each. After having an early October nose through the Christmas departments this year (yes I know, I'm keen to get a head start!) I saw that these types of decorations are again popular for 2016.

Read More

Make Your Own Traditional Christmas Door Wreath


Make Your Own Traditional Christmas Door Wreath

The Christmas wreath, for me,  is an integral part  of Xmas decor.  I  take  huge pride  in  my   Christmas wreath,  as  everyone sees  it when they  pass  your  home.  It's also the  first  thing  guests  see  when   they  arrive  for  celebrations!  The  thing  is,  a  pretty  Xmas  wreath  can  often  cost  more  than  buying  the  Xmas  tree!  Go  to  a  florist  and   you'll  be  looking  at  £100+  for  anything  detailed.  Even  local  flower  markets  charge  a  good  £30-£40  for  a   basic  'real'  wreath  base  with no  frills.  Yet with a  bit  of prep,  a  bit  of  foraging and  a  glue gun,  you  can create  a  really professional-looking,  real  Xmas wreath for  less than  £20.  

Every  year  I  make  the  Xmas  wreath  for  our  house and  I  find  it  really  enjoyable.  I  whack  on  the Xmas   music,  pour  myself  a  (large)  sherry  and  it  gets  me  in  the  mood  for  Xmas  like  nothing  else!

PART 1: ITS ALL ABOUT THE PREP

DRY  OUT  SOME  SLICES  OF  ORANGE

You  can  buy  dried  orange  slices  in  craft  stores,  but  they  are  so  easy  to  make.  After  you've  turned  the   oven  off  one  night  after  cooking,  slice  up  an  orange  thickly  and  lay  the  slices  on  some  baking  paper  in   the  hot  (but  turned  off)  oven  and  leave  them  overnight.  In  the  morning  take  the  slices  out  of  the  cold   oven  and  leave  them  on  the  side  for  24  hours.  What  you  will  have  at  the  end  are  hardened  orange  slices.

Slice oranges about 1cm thick.

Slice oranges about 1cm thick.

DRY  OUT  SOME  HYDRANGEA  HEADS

If  you  had  a  hydrangea  plant  in  your  garden  over  summer,  go  outside  and  cut  off  the  now   red/green/brownish  heads  and  hang  them  over  your  cooker (or  on  a  bright,  dry  window  sill)  for  a  few   days.  The  heads  will  dry  out , but  won't  crumble  and  shouldn't  lose  their  colour.  

Leave cut hydrangea heads to dry out for a few days on a window sill.

Leave cut hydrangea heads to dry out for a few days on a window sill.

BUY  SOME  CINNAMON  STICKS  FROM  THE  SUPERMARKET

You'll  find  these  in  the  aisle  with  the  herbs.  Group  them  together  in  bunches  of  3  and  tie  them  with   some  decorative  ribbon  or  twine.

Group cinnamon sticks in bunches of three.

Group cinnamon sticks in bunches of three.

GO  FORAGING  FOR  PINE  CONES,  STRONG  FOLIAGE  &  BERRIES

The  base  of  your  wreath  will  be  made  up  of  foliage  to  bulk  it  out.  The  trick  here  is  to  get  really  strong   foliage  that  won't  wilt  after  a  week.  A  real  Xmas  door  wreath  should  last  about  3 to 4  weeks,  so  you  need   foliage  that  will  stand  the  test  of  time.  I  can't  say  I'm  an  expert  when  it  comes  to  foliage  names,  but  look   around  and  see  what  foliage  has  thick  and  strong  leaves- nothing  that  'flops'  when  you  pick  and  hold  it   up  basically.  Ivy,  bay  leaves  and  holly  leaves  are  all  good.  Hedgerow  is  best  as  it's  strong  and  evergreen.

Pick strong foliage with woody bases that won't wilt for a few weeks.

Pick strong foliage with woody bases that won't wilt for a few weeks.

Go  for  a  Sunday  walk  with  a  carrier  bag  and  a  pair  of  hand  shears  and  collect  your  greens.  While  on  your   stroll  pick  up  fir  cones  and  collect  sprigs  of  berries  for  decoration  on  the  wreath.

POP  INTO  A  CRAFT  STORE  AND  BUY  A  12"  POLYSTYRENE  WREATH  BASE,  A  HOT  GLUE  GUN,   SOME  XMAS  RIBBON  AND  RED  PRE-­‐MADE  BOWS  &  TWINE

You'll  need  a  wreath  base,  a  hot  glue  gun  and  some  decorative  elements  to  complete  your  wreath.  I   prefer  the  polystyrene  bases  to  the  wicker  or  twig  ones  as  they  have  a  larger  surface  area  for you  to   create  a  fatter  wreath.  A  polystyrene  base  should  only  cost  about  £2-­3.    

Add some twine to the top of your wreath before you start to attach the wreath to your door.

Add some twine to the top of your wreath before you start to attach the wreath to your door.

You  will  also  need  a  hot  glue  gun  to  securely  attach  all  your  wreath  elements  to  the  base.  I  use  a  mini hot-glue  gun that  you  can  buy  for  around  a  fiver. 

Pick  a  couple  of  decorative  elements  like  bows  and Xmas  ribbon.  I  find  the  red Xmas  velvet  bows  are   particularly  attractive  on  the  wreath.

PUTTING YOUR WREATH TOGETHER:

Firstly,  loop  some  twine  around  your  polystyrene  base  and  leave  enough  twine  at  the  top  for  your   wreath  to  be  securely  attached  to  your  door.

Glue down the base of the foliage stalk to attach to your polystyrene base.

Glue down the base of the foliage stalk to attach to your polystyrene base.

Use  your  foliage  to  completely  cover  all  the  white  of  the  polystyrene  base.  Make  sure  your  foliage  all   flows  in  a  clockwise  manner  so  it  looks  tidy  and  professional.  Distribute  the  foliage  evenly  and  secure  it   to  the  base  with  the  glue  gun.  

Build up your wreath. Make sure the foliage is attached in a clockwise pattern.

Build up your wreath. Make sure the foliage is attached in a clockwise pattern.

Take  your  dried  hydrangea  heads  and  distribute  them  evenly  on  the  wreath,  facing  forwards.  Secure   with  the  glue  gun.

This now just needs decorative elements!

This now just needs decorative elements!

Along with your dehydrated orange slices and cinnamon sticks, use fir cones and red velvet bows.

Along with your dehydrated orange slices and cinnamon sticks, use fir cones and red velvet bows.

Add  your  cinnamon  bundles,  dried  orange  slices,  fir  cones,  bows  and  berries  onto  the  wreath,  spreading   them  out  so  the  same  one  isn't  too  close  to  the  other,  and  there  is  a  level  of  symmetry. 

Once  you  have  glued  everything  on,  gently  hold  up  the  wreath  and  check  everything  is  glued  on   properly.  Hold  up  the  wreath  by  the  twine  and  check  it  from  every  angle - are  there  any  spaces  that   need  filling?  Is  there  any  of  the  white  base  showing?  Fix  any  problem  areas  then  leave  your  wreath  a   couple  of  hours  to  completely  dry.

Hang  your  wreath  on  your  front  door  and  enjoy  the  festive  appeal  it  brings  to  your  home!  Here  is  my   wreath  on  my  front  door  in  all  It's  glory.  It  is  so  much  more  enjoyable  knowing  you  made  it  yourself  and   it  cost  a  fraction  of  a  pre-­made  wreath  by  someone  else. 

What would you add on your Xmas wreath? Let me know in the comments section below!

Wrap Xmas Presents Like A Pro! My Top 5 Festive Gift Topper Ideas

Whoop! Here it is - first Christmas post! Expect many more over the next few weeks - I've got posts on making door wreaths to tree decorations alongside DIY table setting ideas. First up are my top 5 crafty ideas for making your Christmas gifts look A+. They are also super easy and cheap to do. Wrap your presents early and put them under the tree to enjoy in your home until you have to give them away!

Read More

Create Stylish Halloween Decor With Painted & Pimped Up Pumpkins!

With seasonal decor I always like it to be made with natural elements, rather than being too plastic-fantastic. Halloween you can go a little bit craaayy-zeee, but I still want the decor to look stylish.This year for Halloween I decided that I'd make the most of the steps leading up to my front door and experiment with painting pumpkins and using flowers in the design, rather than traditional carving.

Read More

Craft A Cheap & Easy Sunburst-Style Door Wreath For Autumn

I'm sure i've probably mentioned this before, but I'm a sucker for a door wreath. They are such a brilliant decoration to celebrate an occasion/season, and they really add serious kerb appeal to your home. Everyone loves to walk past and look at a home with a beautiful door wreath don't they? Autumn provides the easiest and the cheapest opportunity for a door wreath, as you can pick the supplies up scattered all around outside in the street! Conkers, acorns, dried leaves in a multitude of reds, yellows and browns are all great to use on a home-made Autumn wreath, so it's a great craft to do with kids as you can get them to run around sourcing all the bits!

Read More

How To Throw A Chic Autumn Dinner Party With LSA International Glassware

If there is one thing to make me add a restaurant to my 'never to return' list (apart from no-reservation policies - what is all that about???), it's serving me a glass of wine in the kind of tumbler you used to get your water in with your school dinner. Being a grown up, and probably paying way over a fiver for a glass of wine, I'm pretty partial to having it in a decent glass. As you can imagine, when LSA International (the official sponsor of the Amara Interior Blog Awards 2016) wanted to gift me some of their glass pieces for making the Best DIY & Craft Award shortlist, I was delighted! LSA International are celebrating 50 years of production this year, and you can see why their products are still regular features on wedding gift lists with their beautiful collections of handblown glass, porcelain, leather, wood and enamelled steel.

Read More